
Introduction
Using Azure Event Hub, Azure Stream Analytics, Power BI and a little bit of coding you can build a highly scalable, distributed and fully managed real-time event processing system. This article describes how you can build such a system in less than an hour!
Azure Event Hub is a scalable event processing service that can ingest millions of events per second. You can setup multiple parallel executors to subscribe to this service to receive these events for further processing. You can also connect this service to Azure Stream Analytics jobs to transform/process incoming events using an SQL like language and route the results to a destination data store or to a data visualization tool like Power BI all in real-time.
The concept of Partition in Azure Event Hub enables you to parallelize downstream consumption of events by your receivers. Incoming event to your event hub is spread across these partitions (typically, between 2 to 32, configured by you in Azure). You can also send events to specific partitions if you have to. Though it is better to use Publisher Policy in such a case. The diagram below captures the essence of Event Publishers, Partitions and Readers in an Event Hub. Further details are at the official documentation site.

Java Code for Event Publisher/Consumer
In my example here, I am generating a dataset {id, partitionId, createTime, count, value} from the Event Publishers (aka Sender). In this example, for each partition in Azure Event Hub there are N number of Event Publishers sending events to a specific partition. However, you do not have to send events to specific Partitions as stated above. Each Event Publisher is incrementing its count field by 1 starting with 0, and generating a random number between -1000 and +1000, for every sent event. By default, events are sent every 60 seconds. These parameters are all configurable in the eventhub.properties file in the codebase.
The Event Consumer (aka receiver) code starts an asynchronous listener for each partition. So, there is an Event Consumer collecting all events sent by the N Event Publisher for each Partition. If your Event Hub is configured to with 2 Partitions and eventhub.sender.count in eventhub.properties file in your code is 4, you are running 8 Event Publishers and 4 Event Consumers. The code uses the default consumer group for keep things simple.
The code is written in Java and available in GitHub.
Setup
You need an Azure Subscription and a Power BI account for this exercise.
Azure Event Hub Setup

From Azure Portal, create the Event Hub Service (New->Internet Of Things -> Event Hubs). Fig 2. shows the different fields in the page. The Name here should match the eventhub.namespace property in the eventhub.properties file above in your code. In pricing tier, you can select between Basic and Standard. The latter gives you more Consumer Groups, Brokered connections, Message retention, Publisher policies.
Generally, it is best practice to create a new Resource Group for the new Event Hub Service. It is easier managed that way.
Once the Service is created and you are inside the Event Hubs blade, look for the + Event Hub link at the top of the middle blade. Click the link to create a new Event Hub. Note that Name should match eventhub.name property in the eventhub.properties file above in your code. The partition names by default are 0, 1, 2 and so on. So, if you have 2 partitions, the corresponding entry for eventhub.partition.ids in the eventhub.properties file above in your code is 0,1.

Click the Shared access policies link in left blade in Fig 3. and click on the default policy RootManageSharedAccessKey and note Secondary Key, which should match eventhub.sas.key in the eventhub.properties file above in your code.
Azure Stream Analytics

From the Azure Portal, create a Stream Analytics job by clicking New -> Internet of Things -> Stream Analytics job. Fill in the form with necessary information. Once the job is created, notice under the left blade, links to Inputs, Query and Outputs, as in Fig 4. Use these links to define your input source, the query on the in coming data and the destination.
In our example, the input is coming from the Azure Event Hub we created above. The query is a simple pass through that selects all data from input. The output will be sent to Power BI.

As you see in Fig 5. if you select ‘Use event hub from current subscription’ from Subscriptions in the first field, the remaining fields are filled from your subscription by Azure Portal.
Make sure the Event serialization format is set to JSON. The java code in the example here, sends events in json format. You can customize it to csv or Avro if you want.
Provide an input alias for this input source. In Fig 5. it is entered as TBDemoStreamAnalyticsInput.

Next, from Outputs link in your Stream Analytics left blade, select Power BI, enter an Output Alias and Authorize to Power BI with your Power BI account. For our example here, we are assuming the Output alias as TBDemoStreamAnalyticsOutputPowerBI.
Once you authorize to Power BI, you can then select a Dataset Name for this output in Power BI for one of your Group Workspaces.
In our example, we user TBDemoStreamAnalyticsDataset as the Dataset name and select the default My Workspace.
You should also select a Table name for Power BI to persist the data. In our example, it is TBDemoEventsTable.
Now click on Query in your Stream Analytics left blade and enter SELECT * INTO TBDemoStreamAnalyticsOutputPowerBI FROM TBDemoStreamAnalyticsInput.
Operation
Send and Receive Events using java code
Get the code from GitHub into a local folder in your desktop running Java 8 and Maven. Read the README.txt file. Edit the src/main/resource/eventhub.properties file and ensure the properties match the Event Hub setup from the above Setup section. Run the following from your local folder, from command line, to start the Event Senders.
mvn install
mvn package
java -jar .\target\TBCodeEvents-0.0.1-SNAPSHOT-jar-with-dependencies.jar META-INF/eventhub.properties send
On a different terminal window, go to the root source folder as above, and run the following command to start the Event Receivers.
java -jar .\target\TBCodeEvents-0.0.1-SNAPSHOT-jar-with-dependencies.jar META-INF/eventhub.properties receive
You should start seeing messages being sent and received in the two terminals as below.


View Events from Power BI
Log in to your Power BI account and under Datasets on the left Menu list, click on Streaming datasets. You should now see the incoming Streaming data in the list. In our example, it is TBDemoStreamAnalyticsDataset.

Click on the first icon under Actions, which is to create report.
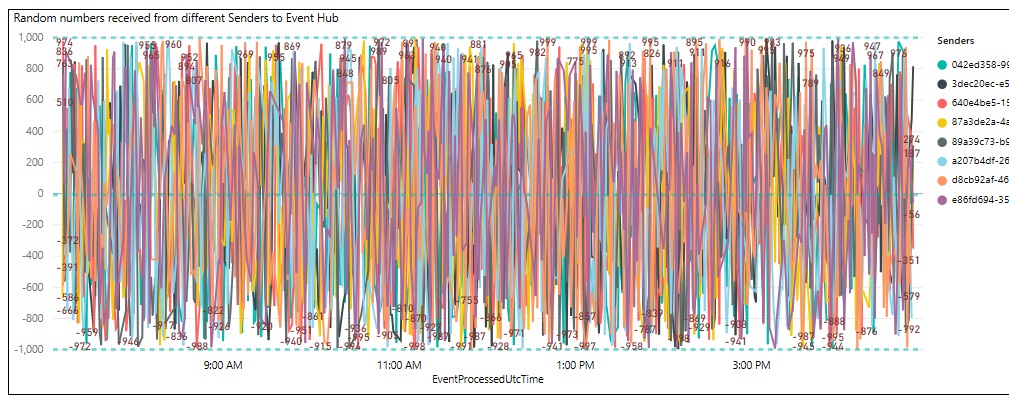
In the Power BI Reports Dashboard, select a line graph and plot the value field against any of the time fields.
Below in Fig 10. you see a plot of all events from all the different Event Senders, sent every minute. You can easily validate from the graph that the Senders are all sending in random values. Also, the random values are between -1000 and +1000, as set in your java code.

